
Francisco Javier Cruces Doval
Thursday, March 28, 2024 | 16 minutes
VPN site to site with OpenVPN and x509 certificates
Riding the stage
To perform this exercise I have mounted the following scenario on GNS3:
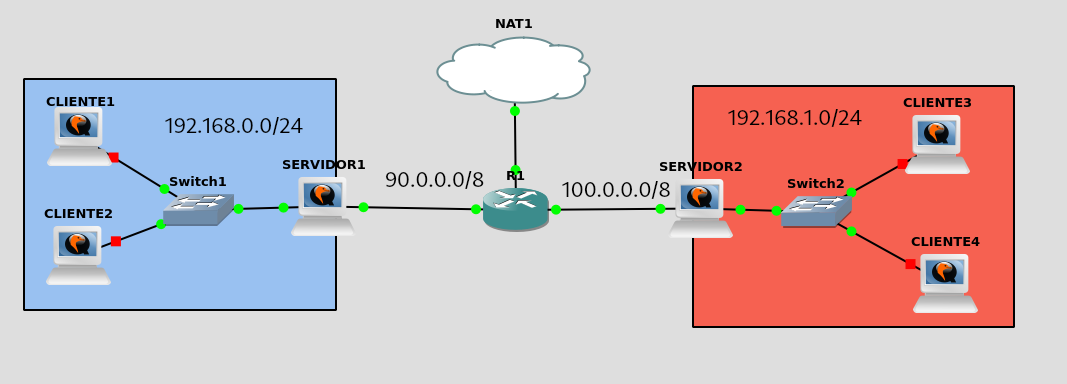
Swan router configuration
Let’s give each interface the corresponding network configuration:
#Interfaz que nos dará internet
R1#configure terminal
R1(config)#interface fastEthernet 0/0
R1(config-if)#ip add dhcp
R1(config-if)#no shut
R1(config-if)#exit

#Interfaz red Servidor 1
R1(config)#interface fastEthernet 1/0
R1(config-if)#ip add 90.0.0.1 255.255.255.0
R1(config-if)#no shut
R1(config-if)#exit

#Interfaz red Servidor 2
R1(config)#interface fastEthernet 1/1
R1(config-if)#ip add 100.0.0.1 255.255.255.0
R1(config-if)#no shut
R1(config-if)#exit

#Ruta por defecto para internet
R1(config)#ip route 0.0.0.0 0.0.0.0 192.168.122.1

#Guarda la configuración
R1#write

#Configuración de SNAT
R1#conf term

R1(config)#access-list 1 permit 90.0.0.0 0.0.0.255
R1(config)#access-list 1 permit 100.0.0.0 0.0.0.255

R1(config)# ip nat pool NAT-Pool 192.168.122.127 192.168.122.127 prefix-length 24
R1(config)#ip nat inside source list 1 pool NAT-Pool overload

R1(config)#interface FastEthernet0/0
R1(config-if)#ip nat outside

R1(config)#interface FastEthernet1/0
R1(config-if)#ip nat inside

R1(config)#interface FastEthernet1/1
R1(config-if)#ip nat inside
Server Configuration 1
Server 1 network configuration:
debian@servidor1:~$ cat /etc/network/interfaces

auto lo
iface lo inet loopback

auto ens3
iface ens3 inet static
        address 90.0.0.2
        netmask 255.255.255.0
        gateway 90.0.0.1
        dns-nameservers 8.8.8.8

auto ens4
iface ens4 inet static
        address 192.168.0.1
        netmask 255.255.255.0
We will also configure the SNAT:
#Activa el bit de forwarding
debian@servidor1:~$ sudo nano /etc/sysctl.conf
net.ipv4.ip_forward=1

#Regla SNAT
debian@servidor1:~$ sudo iptables -t nat -A POSTROUTING -o ens3 -s 192.168.0.0/24 -j MASQUERADE

#Te recomiendo que lo hagas permanente , configura iptables-persistent
debian@servidor1:~$ sudo apt install iptables-persistent
Server Configuration 2
Server 2 network configuration:
debian@servidor2:~$ cat /etc/network/interfaces

auto lo
iface lo inet loopback

auto ens3
iface ens3 inet static
        address 100.0.0.2
        netmask 255.255.255.0
        gateway 100.0.0.1
        dns-nameservers 8.8.8.8

auto ens4
iface ens4 inet static
        address 192.168.1.1
        netmask 255.255.255.0
We will also configure the SNAT:
#Activa el bit de forwarding
debian@servidor2:~$ sudo nano /etc/sysctl.conf
net.ipv4.ip_forward=1

#Regla SNAT
debian@servidor2:~$ sudo iptables -t nat -A POSTROUTING -o ens3 -s 192.168.1.0/24 -j MASQUERADE

#Te recomiendo que lo hagas permanente , configura iptables-persistent
debian@servidor2:~$ sudo apt install iptables-persistent
Roulting check
We will check that we have routed our stage well, for that from the servers we will do a ping on the contrary and has the Internet.
From server 1:
debian@servidor1:~$ ping 8.8.8.8  -c 1
PING 8.8.8.8 (8.8.8.8) 56(84) bytes of data.
64 bytes from 8.8.8.8: icmp_seq=1 ttl=112 time=37.4 ms

--- 8.8.8.8 ping statistics ---
1 packets transmitted, 1 received, 0% packet loss, time 0ms
rtt min/avg/max/mdev = 37.374/37.374/37.374/0.000 ms
debian@servidor1:~$

debian@servidor1:~$ ping 100.0.0.2 -c 1
PING 100.0.0.2 (100.0.0.2) 56(84) bytes of data.
64 bytes from 100.0.0.2: icmp_seq=1 ttl=63 time=18.6 ms

--- 100.0.0.2 ping statistics ---
1 packets transmitted, 1 received, 0% packet loss, time 0ms
rtt min/avg/max/mdev = 18.567/18.567/18.567/0.000 ms
debian@servidor1:~$
From server 2:
debian@servidor2:~$ ping 90.0.0.2 -c 1
PING 90.0.0.2 (90.0.0.2) 56(84) bytes of data.
64 bytes from 90.0.0.2: icmp_seq=1 ttl=63 time=19.1 ms

--- 90.0.0.2 ping statistics ---
1 packets transmitted, 1 received, 0% packet loss, time 0ms
rtt min/avg/max/mdev = 19.099/19.099/19.099/0.000 ms

debian@servidor2:~$ ping 8.8.8.8 -c 1
PING 8.8.8.8 (8.8.8.8) 56(84) bytes of data.
64 bytes from 8.8.8.8: icmp_seq=1 ttl=112 time=160 ms

--- 8.8.8.8 ping statistics ---
1 packets transmitted, 1 received, 0% packet loss, time 0ms
rtt min/avg/max/mdev = 160.147/160.147/160.147/0.000 ms
debian@servidor2:~$
We will also check from the customers as you have set up a snack.
From customer 1:
debian@cliente1:~$ ping 100.0.0.2 -c 1
PING 100.0.0.2 (100.0.0.2) 56(84) bytes of data.
64 bytes from 100.0.0.2: icmp_seq=1 ttl=62 time=19.0 ms

--- 100.0.0.2 ping statistics ---
1 packets transmitted, 1 received, 0% packet loss, time 0ms
rtt min/avg/max/mdev = 18.968/18.968/18.968/0.000 ms

debian@cliente1:~$ ping 8.8.8.8 -c 1
PING 8.8.8.8 (8.8.8.8) 56(84) bytes of data.
64 bytes from 8.8.8.8: icmp_seq=1 ttl=111 time=61.6 ms

--- 8.8.8.8 ping statistics ---
1 packets transmitted, 1 received, 0% packet loss, time 0ms
rtt min/avg/max/mdev = 61.598/61.598/61.598/0.000 ms
From customer 3:
debian@cliente3:~$ ping 90.0.0.2 -c 1
PING 90.0.0.2 (90.0.0.2) 56(84) bytes of data.
64 bytes from 90.0.0.2: icmp_seq=1 ttl=62 time=15.7 ms

--- 90.0.0.2 ping statistics ---
1 packets transmitted, 1 received, 0% packet loss, time 0ms
rtt min/avg/max/mdev = 15.656/15.656/15.656/0.000 ms

debian@cliente3:~$ ping 8.8.8.8 -c 1
PING 8.8.8.8 (8.8.8.8) 56(84) bytes of data.
64 bytes from 8.8.8.8: icmp_seq=1 ttl=111 time=45.8 ms

--- 8.8.8.8 ping statistics ---
1 packets transmitted, 1 received, 0% packet loss, time 0ms
rtt min/avg/max/mdev = 45.760/45.760/45.760/0.000 ms
OpenVPN installation
We will install the openvpn package on both servers
#Servidor 1
debian@servidor1:~$ sudo apt install -y openvpn
#Servidor 2
debian@servidor2:~$ sudo apt install -y openvpn
Key and certificate generation
We can generate the certificates manually, but there is a tool called Easy RSA that automates this process. In addition, Easy RSA facilitates the generation of Diffie-Hellman modules, which are essential for the operation of the OpenVPN server.
We don’t need to download it since it comes with the openvpn package.
For OpenVPN we need to create:
- A private key and a x509 certificate for the certifying authority it signs (CA)
- A private key and a signed x509 certificate for the server.
- A private key and a signed x509 certificate for each client.
- A Diffie-Hellman group for the server.
On server 1, we will copy the variable example file to avoid the repeated request of information such as organization, country, province, etc., by EasyRSA.
debian@servidor1:/usr/share/easy-rsa$ sudo cp vars.example vars
We will edit the same and change the following values:
debian@servidor1:/usr/share/easy-rsa$ sudo nano vars
set_var EASYRSA_REQ_COUNTRY     "ES"
set_var EASYRSA_REQ_PROVINCE    "Sevilla"
set_var EASYRSA_REQ_CITY        "Dos Hermanas"
set_var EASYRSA_REQ_ORG         "iesgn"
set_var EASYRSA_REQ_EMAIL       "contacto@javiercd.es"
set_var EASYRSA_REQ_OU          "Informatica"
Once we have changed the default values to our own, we will start the public key infrastructure (PKI) using the EasyRSA script. When running this command, a new PKI directory is created with the structure needed to manage the keys and certificates.
debian@servidor1:/usr/share/easy-rsa$ sudo ./easyrsa init-pki
* Notice:

  init-pki complete; you may now create a CA or requests.

  Your newly created PKI dir is:
  * /usr/share/easy-rsa/pki
Generation of the Diffie-Hellman parameters
The Diffie-Hellman exchange key is a cryptographic method that allows two parties to safely agree on a shared session key on an unsafe channel. So let’s generate it by using the following command:
debian@servidor1:/usr/share/easy-rsa$ sudo  ./easyrsa gen-dh
* Notice:
Using Easy-RSA configuration from: /usr/share/easy-rsa/vars

* WARNING:

  Move your vars file to your PKI folder, where it is safe!

* Notice:
Using SSL: openssl OpenSSL 3.0.11 19 Sep 2023 (Library: OpenSSL 3.0.11 19 Sep 2023)

Generating DH parameters, 2048 bit long safe prime

.........

* Notice:

DH parameters of size 2048 created at /usr/share/easy-rsa/pki/dh.pem
We will have been generated the key in / usr / share / easy-rsa / pki / dh.pem, as indicated by the command output.
Generation of CA certificate
We will proceed to generate the certificate of our CA:
debian@servidor1:/usr/share/easy-rsa$ sudo ./easyrsa build-ca nopass
* Notice:
Using Easy-RSA configuration from: /usr/share/easy-rsa/vars

* WARNING:

  Move your vars file to your PKI folder, where it is safe!

* Notice:
Using SSL: openssl OpenSSL 3.0.11 19 Sep 2023 (Library: OpenSSL 3.0.11 19 Sep 2023)

Using configuration from /usr/share/easy-rsa/pki/52a64968/temp.25a8f31d

You are about to be asked to enter information that will be incorporated
into your certificate request.
What you are about to enter is what is called a Distinguished Name or a DN.
There are quite a few fields but you can leave some blank
For some fields there will be a default value,
If you enter '.', the field will be left blank.
-----
Common Name (eg: your user, host, or server name) [Easy-RSA CA]:ca.javiercd.es

* Notice:

CA creation complete and you may now import and sign cert requests.
Your new CA certificate file for publishing is at:
/usr/share/easy-rsa/pki/ca.crt
We will have been generated in / usr / share / easy-rsa / pki / ca.crt
Server certificate generation 1
With the following command we will generate the certificates for server 1. Several files will be generated:
- servor1.req: This file contains the certificate application generated for the server
- servor1.key: This file contains the private key
debian@servidor1:/usr/share/easy-rsa$ sudo ./easyrsa gen-req servidor1 nopass
* Notice:
Using Easy-RSA configuration from: /usr/share/easy-rsa/vars

* WARNING:

  Move your vars file to your PKI folder, where it is safe!

* Notice:
Using SSL: openssl OpenSSL 3.0.11 19 Sep 2023 (Library: OpenSSL 3.0.11 19 Sep 2023)

....+++++++++++++++++++++++++++++++++++++++++++++++++++++++++++++++++*..+........+...+.+......+..+++++++++++++++++++++++++++++++++++++++++++++++++++++++++++++++++*.+............+...+....+...+.....+...+...+......+....+.....+......+...+.+..+...+....+..+...............+......+.........+......+.......+.....+......+.+........+.+.....+......+...............+.+.....+++++++++++++++++++++++++++++++++++++++++++++++++++++++++++++++++
....+............+..+.+...+...........+....+...........+......+...+.+...+..+.+........+....+...+.....+.......+++++++++++++++++++++++++++++++++++++++++++++++++++++++++++++++++*.........+............+...+.....+....+..+...+.+...............+.....+......+++++++++++++++++++++++++++++++++++++++++++++++++++++++++++++++++*......+........+..........+...+.................+.+..+....+.....+..........+...+......+.........+.....+.+............+..+..................+...+++++++++++++++++++++++++++++++++++++++++++++++++++++++++++++++++
-----
You are about to be asked to enter information that will be incorporated
into your certificate request.
What you are about to enter is what is called a Distinguished Name or a DN.
There are quite a few fields but you can leave some blank
For some fields there will be a default value,
If you enter '.', the field will be left blank.
-----
Common Name (eg: your user, host, or server name) [servidor1]:
* Notice:

Keypair and certificate request completed. Your files are:
req: /usr/share/easy-rsa/pki/reqs/servidor1.req
key: /usr/share/easy-rsa/pki/private/servidor1.key
Now let’s sign the server’s certification1 with the CA’s private key.
debian@servidor1:/usr/share/easy-rsa$ sudo ./easyrsa sign-req server servidor1
* Notice:
Using Easy-RSA configuration from: /usr/share/easy-rsa/vars

* WARNING:

  Move your vars file to your PKI folder, where it is safe!

* Notice:
Using SSL: openssl OpenSSL 3.0.11 19 Sep 2023 (Library: OpenSSL 3.0.11 19 Sep 2023)


You are about to sign the following certificate.
Please check over the details shown below for accuracy. Note that this request
has not been cryptographically verified. Please be sure it came from a trusted
source or that you have verified the request checksum with the sender.

Request subject, to be signed as a server certificate for 825 days:

subject=
    commonName                = servidor1


Type the word 'yes' to continue, or any other input to abort.
  Confirm request details: yes

Using configuration from /usr/share/easy-rsa/pki/e66a9d70/temp.40a6d9dd
Check that the request matches the signature
Signature ok
The Subject's Distinguished Name is as follows
commonName            :ASN.1 12:'servidor1'
Certificate is to be certified until Apr 18 16:15:16 2026 GMT (825 days)

Write out database with 1 new entries
Database updated

* Notice:
Certificate created at: /usr/share/easy-rsa/pki/issued/servidor1.crt
As you can see we will have the 3 files regarding our 1 server generated:
#Certificado firmado
debian@servidor1:/usr/share/easy-rsa$ sudo ls -la pki/issued | grep servidor1
-rw------- 1 root root 4637 Jan 14 16:15 servidor1.crt

#Clave privada
debian@servidor1:/usr/share/easy-rsa$ sudo ls -la pki/private | grep servidor1
-rw------- 1 root root 1704 Jan 14 16:09 servidor1.key

#Solicitud de firma del certificado
debian@servidor1:/usr/share/easy-rsa$ sudo ls -la pki/reqs | grep servidor1
-rw------- 1 root root  891 Jan 14 16:09 servidor1.req
Server certificate generation 2
We will repeat the same process we have done for server 1, but now for our server 2.
We will generate the key and the certificate:
debian@servidor1:/usr/share/easy-rsa$ sudo ./easyrsa gen-req servidor2 nopass
* Notice:
Using Easy-RSA configuration from: /usr/share/easy-rsa/vars

* WARNING:

  Move your vars file to your PKI folder, where it is safe!

* Notice:
Using SSL: openssl OpenSSL 3.0.11 19 Sep 2023 (Library: OpenSSL 3.0.11 19 Sep 2023)

.+.+.................+...+...+.......+..+.+...........+.+..+.+++++++++++++++++++++++++++++++++++++++++++++++++++++++++++++++++*........+++++++++++++++++++++++++++++++++++++++++++++++++++++++++++++++++*.+....+..+..........+....................+.......+.....+.......+...+..+................+..+.......+.........+...........+....+..+...+.+......+..+...+....+.....+.........+....+......+......+.........+..+...+............+...+.+...+..+....+............+...............+..+...+.............+............+.....+.......+.....+.+......+........+.....................+.+......+..+.+......+.....+.........+......+.........+.......+...+...............+.....+...............+.+....................+......+...+................+...+...+............+.....+...............+.......+......+........+......+....+......+........+.+.....+....+..+.+........+.+.....+.+.....+...........................+......+.+...+.....+......+....+..+....+......+........+.............+..+...+.........+....+..+...+....+...+...+...........+......+...................+.....+................+...+..+....+...+..+......+...+..........+..+.......+++++++++++++++++++++++++++++++++++++++++++++++++++++++++++++++++
..........+............+...+....+...+.....+...+......+.+.....+.......+..+++++++++++++++++++++++++++++++++++++++++++++++++++++++++++++++++*.........+.+......+..+.+..+...+.........+............+..................+.......+++++++++++++++++++++++++++++++++++++++++++++++++++++++++++++++++*.+...+...........+.+...+..+....+..............+......+...............+.+......+..............+....+......+..................+...+............+..+....+.....+.......+...+.........+..+......+...+++++++++++++++++++++++++++++++++++++++++++++++++++++++++++++++++
-----
You are about to be asked to enter information that will be incorporated
into your certificate request.
What you are about to enter is what is called a Distinguished Name or a DN.
There are quite a few fields but you can leave some blank
For some fields there will be a default value,
If you enter '.', the field will be left blank.
-----
Common Name (eg: your user, host, or server name) [servidor2]:
* Notice:

Keypair and certificate request completed. Your files are:
req: /usr/share/easy-rsa/pki/reqs/servidor2.req
key: /usr/share/easy-rsa/pki/private/servidor2.key
See that now to this certificate when we sign it we’ll say it’s client type. Since server 2 “acted as a client”:
debian@servidor1:/usr/share/easy-rsa$ sudo ./easyrsa sign-req client servidor2
* Notice:
Using Easy-RSA configuration from: /usr/share/easy-rsa/vars

* WARNING:

  Move your vars file to your PKI folder, where it is safe!

* Notice:
Using SSL: openssl OpenSSL 3.0.11 19 Sep 2023 (Library: OpenSSL 3.0.11 19 Sep 2023)


You are about to sign the following certificate.
Please check over the details shown below for accuracy. Note that this request
has not been cryptographically verified. Please be sure it came from a trusted
source or that you have verified the request checksum with the sender.

Request subject, to be signed as a client certificate for 825 days:

subject=
    commonName                = servidor2


Type the word 'yes' to continue, or any other input to abort.
  Confirm request details: yes

Using configuration from /usr/share/easy-rsa/pki/8e1b2785/temp.504078d9
Check that the request matches the signature
Signature ok
The Subject's Distinguished Name is as follows
commonName            :ASN.1 12:'servidor2'
Certificate is to be certified until Apr 18 16:57:49 2026 GMT (825 days)

Write out database with 1 new entries
Database updated

* Notice:
Certificate created at: /usr/share/easy-rsa/pki/issued/servidor2.crt
Generation of the TLS key
This step is optional, but it is recommended to generate a shared key (also known as additional parameter key or ta.key key) in the OpenVPN context.)
In the context of OpenVPN, this shared key (ta.key) is used to sign and verify all data packages transmitted through the VPN connection. Its main purpose is to provide an additional layer of security and authentication, helping to prevent attacks such as the replay.
debian@servidor1:/usr/share/easy-rsa$ sudo openvpn --genkey --secret ta.key
Distribute the keys
Now we have to get every key to its proper place.
In server 1 we will create the / etc / openvpn / keys directory and save the following files:
#Creamos el directorio donde guardaremos las claves
debian@servidor1:/usr/share/easy-rsa$ sudo mkdir /etc/openvpn/keys

#Nos la copiamos al directorio creado
debian@servidor1:~$ sudo cp /usr/share/easy-rsa/pki/dh.pem /etc/openvpn/keys
debian@servidor1:~$ sudo cp /usr/share/easy-rsa/pki/ca.crt /etc/openvpn/keys
debian@servidor1:~$ sudo cp /usr/share/easy-rsa/pki/private/servidor1.key /etc/openvpn/keys
debian@servidor1:~$ sudo cp /usr/share/easy-rsa/pki/issued/servidor1.crt /etc/openvpn/keys
debian@servidor1:~$ sudo cp /usr/share/easy-rsa/ta.key /etc/openvpn/keys

#Comprobamos que tenemos todoos los ficheros necesarios
debian@servidor1:~$ sudo ls -l /etc/openvpn/keys
total 24
-rw------- 1 root root 1216 Jan 14 17:08 ca.crt
-rw------- 1 root root  424 Jan 14 17:08 dh.pem
-rw------- 1 root root 4637 Jan 14 17:08 servidor1.crt
-rw------- 1 root root 1704 Jan 14 17:08 servidor1.key
-rw------- 1 root root  636 Jan 14 17:08 ta.key
Now we’ll do the same for the service2, but we’ll have to take the keys using SCP.
#Creamos el directorio donde guardaremos las claves
debian@servidor2:~$ sudo mkdir /etc/openvpn/keys

#Desde servidor1 pasare a servidor2 las claves

debian@servidor1:~$ sudo scp /usr/share/easy-rsa/pki/ca.crt debian@100.0.0.2:/home/debian
debian@servidor1:~$ sudo scp /usr/share/easy-rsa/ta.key debian@100.0.0.2:/home/debian
debian@servidor1:~$ sudo scp /usr/share/easy-rsa/pki/private/servidor2.key debian@100.0.0.2:/home/debian
debian@servidor1:~$ sudo scp /usr/share/easy-rsa/pki/issued/servidor2.crt debian@100.0.0.2:/home/debian

#Las movemos a /etc/openvpn/keys
debian@servidor2:~$ sudo mv * /etc/openvpn/keys

#Nos aseguramos de tener los 4 ficheros que hemos enviado :
debian@servidor2:~$ sudo ls -l /etc/openvpn/keys
total 20
-rw------- 1 debian debian 1216 Jan 14 17:12 ca.crt
-rw------- 1 debian debian 4515 Jan 14 17:14 servidor2.crt
-rw------- 1 debian debian 1704 Jan 14 17:13 servidor2.key
-rw------- 1 debian debian  636 Jan 14 17:13 ta.key
OpenVPN configuration
Server configuration 1
[NOTE] This section is comparing it to the remote access VPN post.
As you see the only parameters that we have changed in the configuration is the virtual IP and the route parameter to generate the route to the private network at the other end:
debian@servidor1:~$ sudo nano /etc/openvpn/servidor1.conf
#Utilizar un dispositivo TUN dinámico
dev tun
#IP virtual
ifconfig 10.99.99.1 10.99.99.2
#Ruta para llegar a la red del otro extremo
route 192.168.1.0 255.255.255.0
#Habilitar TLS y asumir el rol de servidor
tls-server
#Parámetros de Diffie-Hellman
dh /etc/openvpn/keys/dh.pem
#Certificado de la Autoridad Certificadora
ca /etc/openvpn/keys/ca.crt
#Certificado del servidor
cert /etc/openvpn/keys/servidor1.crt
#Clave privada del servidor
key /etc/openvpn/keys/servidor1.key
#Utilizar compresión LZO rápida
comp-lzo
#Ping al remoto cada 10 segundos y reiniciar después de 60 segundos
keepalive 10 60
#Establecer la verbosidad de salida en un rango de uso normal
verb 3
Restart OpenVPN service from server 1:
debian@servidor1:~$ sudo systemctl restart openvpn
Check your tun0 interface:
debian@servidor1:~$ ip a show tun0
9: tun0: <POINTOPOINT,MULTICAST,NOARP,UP,LOWER_UP> mtu 1500 qdisc fq_codel state UNKNOWN group default qlen 500
    link/none
    inet 10.99.99.1 peer 10.99.99.2/32 scope global tun0
       valid_lft forever preferred_lft forever
    inet6 fe80::a6be:e8ba:17e5:35e3/64 scope link stable-privacy
       valid_lft forever preferred_lft forever
And finally check that the route to reach the network at the other end is correct, that is, it goes through the tun0 interface:
debian@servidor1:~$ ip r
default via 90.0.0.1 dev ens3 onlink
10.99.99.2 dev tun0 proto kernel scope link src 10.99.99.1
90.0.0.0/24 dev ens3 proto kernel scope link src 90.0.0.2
192.168.0.0/24 dev ens4 proto kernel scope link src 192.168.0.1
192.168.1.0/24 via 10.99.99.2 dev tun0
Server configuration 2
debian@servidor2:~$ sudo nano /etc/openvpn/servidor2.conf
#Utilizar un dispositivo TUN dinámico
dev tun
#Conectar al servidor
remote 90.0.0.2
#Establecer direcciones IP virtuales punto a punto
ifconfig 10.99.99.2 10.99.99.1
#Ruta para llegar a la red remota (local del servidor 1)
route 192.168.0.0 255.255.255.0
#Habilitar TLS y asumir el rol de cliente durante el handshake de TLS
tls-client
#Certificado de la Autoridad Certificadora
ca /etc/openvpn/keys/ca.crt
#Certificado del cliente
cert /etc/openvpn/keys/servidor2.crt
#Clave privada del cliente
key /etc/openvpn/keys/servidor2.key
#Utilizar compresión LZO rápida
comp-lzo
#Hacer ping al remoto cada 10 segundos y reiniciar después de 60 segundos si no hay señal de vida del >
keepalive 10 60
#Establecer la verbosidad de salida en un rango de uso normal
verb 3
#Registrar mensajes en el archivo openvpn.log
log /var/log/openvpn.log
Reboot OpenVPN service on server 2 to apply the new configuration:
debian@servidor2:~$ sudo systemctl restart openvpn
Check your tun0 interface:
debian@servidor2:~$ ip a show tun0
10: tun0: <POINTOPOINT,MULTICAST,NOARP,UP,LOWER_UP> mtu 1500 qdisc fq_codel state UNKNOWN group default qlen 500
    link/none
    inet 10.99.99.2 peer 10.99.99.1/32 scope global tun0
       valid_lft forever preferred_lft forever
    inet6 fe80::ded7:8620:c295:146a/64 scope link stable-privacy
       valid_lft forever preferred_lft forever
And finally check that the route to reach the network at the other end is correct, that is, it goes through the tun0 interface:
debian@servidor2:~$ ip r
default via 100.0.0.1 dev ens3 onlink
10.99.99.1 dev tun0 proto kernel scope link src 10.99.99.2
100.0.0.0/24 dev ens3 proto kernel scope link src 100.0.0.2
192.168.0.0/24 via 10.99.99.1 dev tun0
192.168.1.0/24 dev ens4 proto kernel scope link src 192.168.1.1
Operating check
Now, both private networks, both 192.168.0.0 / 24 and 192.168.1.0 / 24, will have connectivity thanks to VPN servers.
Ping from client 1 to client 2:
debian@cliente1:~$ ping 192.168.1.2 -c 1
PING 192.168.1.2 (192.168.1.2) 56(84) bytes of data.
64 bytes from 192.168.1.2: icmp_seq=1 ttl=62 time=15.6 ms

--- 192.168.1.2 ping statistics ---
1 packets transmitted, 1 received, 0% packet loss, time 0ms
rtt min/avg/max/mdev = 15.645/15.645/15.645/0.000 ms
Ping from client 2 to client 1:
debian@cliente3:~$ ping 192.168.0.2 -c 1
PING 192.168.0.2 (192.168.0.2) 56(84) bytes of data.
64 bytes from 192.168.0.2: icmp_seq=1 ttl=62 time=17.3 ms

--- 192.168.0.2 ping statistics ---
1 packets transmitted, 1 received, 0% packet loss, time 0ms
rtt min/avg/max/mdev = 17.345/17.345/17.345/0.000 ms
Ping from server 1 to server 2:
debian@servidor1:~$ ping 192.168.1.1 -c 1
PING 192.168.1.1 (192.168.1.1) 56(84) bytes of data.
64 bytes from 192.168.1.1: icmp_seq=1 ttl=64 time=18.0 ms

--- 192.168.1.1 ping statistics ---
1 packets transmitted, 1 received, 0% packet loss, time 0ms
rtt min/avg/max/mdev = 17.988/17.988/17.988/0.000 ms
Ping from server 1 to server 2:
debian@servidor2:~$ ping 192.168.0.1 -c 1
PING 192.168.0.1 (192.168.0.1) 56(84) bytes of data.
64 bytes from 192.168.0.1: icmp_seq=1 ttl=64 time=12.6 ms

--- 192.168.0.1 ping statistics ---
1 packets transmitted, 1 received, 0% packet loss, time 0ms
rtt min/avg/max/mdev = 12.558/12.558/12.558/0.000 ms
Of course we can also access any service on the other network or connect to SSH from one end of the tunnel to another:
debian@cliente3:~$ ssh 192.168.0.1
debian@192.168.0.1's password:
Linux servidor1 6.1.0-15-cloud-amd64 #1 SMP PREEMPT_DYNAMIC Debian 6.1.66-1 (2023-12-09) x86_64

The programs included with the Debian GNU/Linux system are free software;
the exact distribution terms for each program are described in the
individual files in /usr/share/doc/*/copyright.

Debian GNU/Linux comes with ABSOLUTELY NO WARRANTY, to the extent
permitted by applicable law.
Last login: Tue Jan 16 18:51:53 2024 from 192.168.1.2
debian@servidor1:~$ ip -4 a
1: lo: <LOOPBACK,UP,LOWER_UP> mtu 65536 qdisc noqueue state UNKNOWN group default qlen 1000
    inet 127.0.0.1/8 scope host lo
       valid_lft forever preferred_lft forever
2: ens3: <BROADCAST,MULTICAST,UP,LOWER_UP> mtu 1500 qdisc fq_codel state UP group default qlen 1000
    altname enp0s3
    inet 90.0.0.2/24 brd 90.0.0.255 scope global ens3
       valid_lft forever preferred_lft forever
3: ens4: <BROADCAST,MULTICAST,UP,LOWER_UP> mtu 1500 qdisc fq_codel state UP group default qlen 1000
    altname enp0s4
    inet 192.168.0.1/24 brd 192.168.0.255 scope global ens4
       valid_lft forever preferred_lft forever
9: tun0: <POINTOPOINT,MULTICAST,NOARP,UP,LOWER_UP> mtu 1500 qdisc fq_codel state UNKNOWN group default qlen 500
    inet 10.99.99.1 peer 10.99.99.2/32 scope global tun0
       valid_lft forever preferred_lft forever
Android client
[TIP] In the network post you will find a guide to install a virtual android machine in KVM and GNS3
The network configuration of the network is done from the wifi:
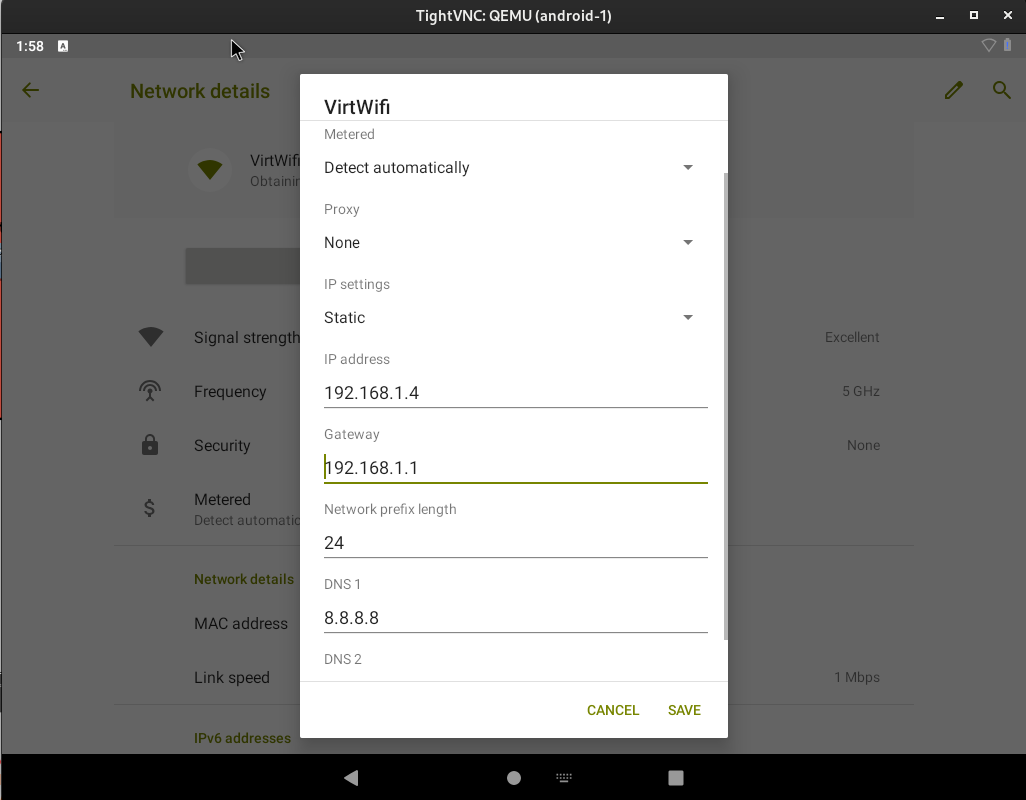
Check that from the local network of it you have connectivity with the assigned ip:
debian@cliente3:~$ ping 192.168.1.4
PING 192.168.1.4 (192.168.1.4) 56(84) bytes of data.
64 bytes from 192.168.1.4: icmp_seq=1 ttl=64 time=0.534 ms
^C
--- 192.168.1.4 ping statistics ---
1 packets transmitted, 1 received, 0% packet loss, time 0ms
rtt min/avg/max/mdev = 0.534/0.534/0.534/0.000 ms
Besides this account in applications with a terminal emulator that will help us check that it has connectivity:
