
Francisco Javier Cruces Doval
Thursday, March 28, 2024 | 6 minutes
Remote access VPN with Ipsec StrongSwan
StrongSwan is a VPN (Virtual Private Network) implementation based on IPsec, open source, multiplatform, complete and widely used. It works on operating systems such as Linux, FreeBSD, OS X, Windows, Android and iOS. Mainly, it is a key exchange demon that supports Internet Key Exchange protocols (IKEv1 and IKEv2) to establish security associations (SA) between two pairs.
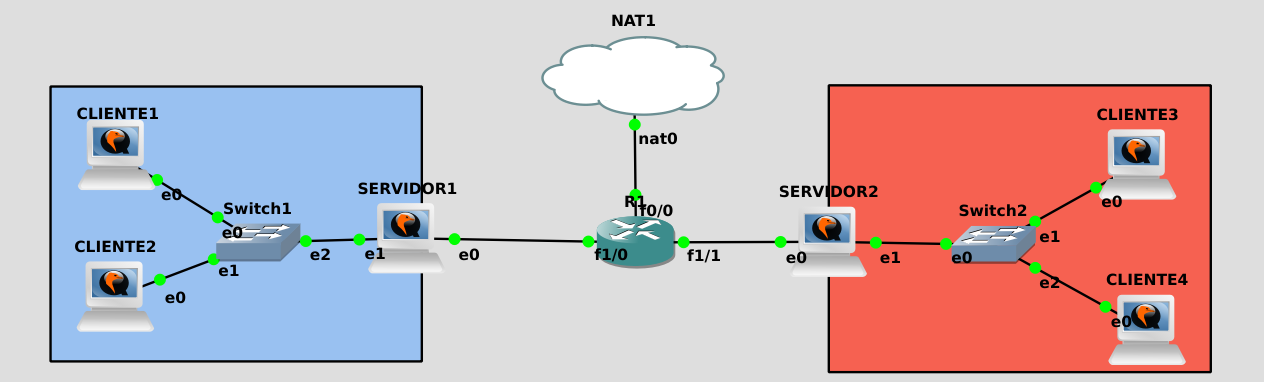
[NOTE] I will start from the VPN post remote access with OpenVPN, so you may refer to this during this article. If you want to have the same scenario go first to this.
Remember that for the configuration we are going to do, you have to activate the forwarding bit on servers 1 and 2.
StrongSwan installation
We will start by installing the StrongSwan package in both machines:
debian@servidor1:~$ sudo apt install strongswan -y
debian@servidor2:~$ sudo apt install strongswan -y
StrongSwan configuration
Server 1
Next we will set up server 1, and I will add a comment so you know what each option means:
debian@servidor1:~$  sudo cat /etc/ipsec.conf
#Configuración global de strongSwan
config setup
       charondebug="ike 2, knl 2, cfg 2, net 2, esp 2, dmn 2,  mgr 2"

#Configuración por defecto para conexiones VPN
conn %default
       ikelifetime=1h            # Tiempo de vida de la negociación de intercambio de claves y SA.
       keylife=1h                # Tiempo de vida de la llave del cifrado.
       rekeymargin=5m            # Margen de tiempo antes de la expiración para la renovación.
       keyingtries=3             # Número máximo de intentos de renegociación.
       keyexchange=ikev2         # Versión del protocolo IKE.
       authby=secret             # Uso de autenticación con clave precompartida (PSK).
       ike=aes256-sha1-modp1024  # Configuración de algoritmos para la fase IKE.
       esp=aes256-sha1           # Configuración de algoritmos para la fase ESP.

conn servidor2a1
       left=90.0.0.2              # Public IP address of the machine (server 1).
       leftsubnet=192.168.0.0/24   # Private subnet of server 1.
       right=100.0.0.2             # Public IP address of the other endpoint (server 2).
       rightsubnet=192.168.1.0/24  # Subred privada del otro extremo (servidor 2).
       auto=start                  # Iniciar la conexión automáticamente al arrancar strongSwan.
# Server 2
Next we will set up server 2, and I will add a comment so you know what each option means:
debian@servidor2:~$ sudo cat /etc/ipsec.conf
#Configuración global de strongSwan
config setup
       charondebug="ike 2, knl 2, cfg 2, net 2, esp 2, dmn 2,  mgr 2"

#Configuración por defecto para conexiones VPN
conn %default
       ikelifetime=1h            # Tiempo de vida de la negociación de intercambio de claves y SA.
       keylife=1h                # Tiempo de vida de la llave del cifrado.
       rekeymargin=5m            # Margen de tiempo antes de la expiración para la renovación.
       keyingtries=3             # Número máximo de intentos de renegociación.
       keyexchange=ikev2         # Versión del protocolo IKE.
       authby=secret             # Uso de autenticación con clave precompartida (PSK).
       ike=aes256-sha1-modp1024  # Configuración de algoritmos para la fase IKE.
       esp=aes256-sha1           # Configuración de algoritmos para la fase ESP.

conn servidor2a1
       left=100.0.0.2            # Public IP address of the machine.
       leftsubnet=192.168.1.0/24  # Private subnet of the machine.
       right=90.0.0.2            # Public IP address of server 1.
       rightsubnet=192.168.0.0/24 # Subred privada del servidor 1.
       auto=start                # Iniciar la conexión automáticamente al arrancar strongSwan.
Generation of the shared key
Once you have configured both machines, it is necessary to agree on the use of a shared key called PSK (Pre-Shared Key). You can generate a PSK randomly to improve connection security. Here is an example of how to generate a random key:
debian@servidor1:~$ head -c 24 /dev/urandom | base64
cXPeOAcKIVszFHp68CcGX6dLXcWcbrIl
Now in the / etc / ipsec.secrets file we will configure the PSK key, which at both ends has to be the same:
debian@servidor1:~$ sudo cat /etc/ipsec.secrets
# Public IP address of server 1
90.0.0.2 : PSK "cXPeOAcKIVszFHp68CcGX6dLXcWcbrIl"

debian@servidor2:~$ sudo cat /etc/ipsec.secrets
# Public IP address of server 2
100.0.0.2 : PSK "cXPeOAcKIVszFHp68CcGX6dLXcWcbrIl"
Once configured, we will restart the service at both ends:
debian@servidor1:~$ sudo ipsec restart
debian@servidor2:~$ sudo ipsec restart
Operating check
We will now see that the tunnel has been lifted at both ends:
debian@servidor1:~$ sudo ipsec status
Security Associations (1 up, 0 connecting):
 servidor1a2[1]: ESTABLISHED 62 seconds ago, 90.0.0.2[90.0.0.2]...100.0.0.2[100.0.0.2]
 servidor1a2{1}:  INSTALLED, TUNNEL, reqid 1, ESP SPIs: ccb4e51d_i c186cf93_o
 servidor1a2{1}:   192.168.0.0/24 === 192.168.1.0/24

debian@servidor2:~$ sudo ipsec status
Security Associations (1 up, 0 connecting):
 servidor2a1[2]: ESTABLISHED 45 seconds ago, 100.0.0.2[100.0.0.2]...90.0.0.2[90.0.0.2]
 servidor2a1{2}:  INSTALLED, TUNNEL, reqid 1, ESP SPIs: c186cf93_i ccb4e51d_o
 servidor2a1{2}:   192.168.1.0/24 === 192.168.0.0/24
It is true that, unlike OpenVPN and WireGuard, StrongSwan does not automatically create a virtual interface for the VPN connection. Instead, it uses the operating system routes to direct traffic through the IPSec tunnel.
Routing tables
We can see these routes as follows. They are stored in table 220:
debian@servidor1:~$ ip r show table 220
192.168.1.0/24 via 90.0.0.1 dev ens3 proto static src 192.168.0.1

debian@servidor2:~$ ip route list table 220
192.168.0.0/24 via 100.0.0.1 dev ens3 proto static src 192.168.1.1
Connectivity check
Once this has been done, we will check that server 2 can reach the machines in the 192.168.0.0/24 network:
debian@servidor2:~$ ping -c 1 192.168.0.1
PING 192.168.0.1 (192.168.0.1) 56(84) bytes of data.
64 bytes from 192.168.0.1: icmp_seq=1 ttl=64 time=12.7 ms

--- 192.168.0.1 ping statistics ---
1 packets transmitted, 1 received, 0% packet loss, time 0ms
rtt min/avg/max/mdev = 12.721/12.721/12.721/0.000 ms

debian@servidor2:~$ ping -c 1 192.168.0.2
PING 192.168.0.2 (192.168.0.2) 56(84) bytes of data.
64 bytes from 192.168.0.2: icmp_seq=1 ttl=63 time=11.5 ms

--- 192.168.0.2 ping statistics ---
1 packets transmitted, 1 received, 0% packet loss, time 0ms
rtt min/avg/max/mdev = 11.485/11.485/11.485/0.000 ms
Tunnel statistics
If you want to see whether the traffic has passed through the tunnel, you can run statusall and see the statistics:
debian@servidor1:~$ sudo ipsec statusall
Status of IKE charon daemon (strongSwan 5.9.8, Linux 6.1.0-17-cloud-amd64, x86_64):
  uptime: 9 minutes, since Jan 28 10:44:01 2024
  malloc: sbrk 2166784, mmap 0, used 1242160, free 924624
  worker threads: 11 of 16 idle, 5/0/0/0 working, job queue: 0/0/0/0, scheduled: 2
  loaded plugins: charon test-vectors ldap pkcs11 aes rc2 sha2 sha1 md5 mgf1 random nonce x509 revocation constraints pubkey pkcs1 pkcs7 pkcs12 pgp dnskey sshkey pem openssl gcrypt pkcs8 af-alg fips-prf gmp curve25519 agent chapoly xcbc cmac hmac kdf ctr ccm gcm drbg curl attr kernel-netlink resolve socket-default connmark forecast farp stroke updown eap-identity eap-aka eap-md5 eap-gtc eap-mschapv2 eap-radius eap-tls eap-ttls eap-tnc xauth-generic xauth-eap xauth-pam tnc-tnccs dhcp lookip error-notify certexpire led addrblock unity counters
Listening IP addresses:
  90.0.0.2
  192.168.0.1
Connections:
 servidor1a2:  90.0.0.2...100.0.0.2  IKEv2
 servidor1a2:   local:  [90.0.0.2] uses pre-shared key authentication
 servidor1a2:   remote: [100.0.0.2] uses pre-shared key authentication
 servidor1a2:   child:  192.168.0.0/24 === 192.168.1.0/24 TUNNEL
Security Associations (1 up, 0 connecting):
 servidor1a2[1]: ESTABLISHED 9 minutes ago, 90.0.0.2[90.0.0.2]...100.0.0.2[100.0.0.2]
 servidor1a2[1]: IKEv2 SPIs: 80b3e1894dc769f5_i* 92c50ec8c2dedde7_r, pre-shared key reauthentication in
43 minutes
 servidor1a2[1]: IKE proposal: AES_CBC_256/HMAC_SHA1_96/PRF_HMAC_SHA1/MODP_1024
 servidor1a2{1}:  INSTALLED, TUNNEL, reqid 1, ESP SPIs: ccb4e51d_i c186cf93_o
 servidor1a2{1}:  AES_CBC_256/HMAC_SHA1_96, 252 bytes_i (3 pkts, 358s ago), 280 bytes_o (3 pkts, 355s ag
o), rekeying in 41 minutes
 servidor1a2{1}:   192.168.0.0/24 === 192.168.1.0/24
Capture with Wireshark
You can also capture the traffic and make sure the messages are encrypted:

Traceroute check
It is also interesting because if you run a traceroute, the first hop it gives is the interface 192.168.0.1 of server 1:
debian@servidor2:~$ traceroute 192.168.0.2
traceroute to 192.168.0.2 (192.168.0.2), 30 hops max, 60 byte packets
 1  192.168.0.1 (192.168.0.1)  13.695 ms  13.658 ms  13.712 ms
 2  192.168.0.2 (192.168.0.2)  13.704 ms  13.695 ms  13.678 ms