
Francisco Javier Cruces Doval
Friday, September 8, 2023 | 5 minutes
Migration of a file system
Sometimes, it is necessary to update the storage of our Debian system to meet the growing space needs and improve the organization of the disk. In this guide, we will explore the migration process from a single disk to one with greater capacity, as well as divide it into separate partitions for more efficient management.
This process will not only expand the available storage space, but also provide a more orderly structure to the system, facilitating tasks such as backup management, system performance and disk space management.
Characteristics of the machine
Create a virtual machine in virt-manager with the following features:
- GNU / Linux Debian11 operating system will be installed.
- Memory size: 1GB.
- CPU: 1
- Hard drive size: 2GB
- Details of the hypervisor:
- chipset: Q35
- Firmware: UEFIX 86
Partition outline
The debian installation will be made, with the following partition scheme: efi partition: 50MB
partition /: 2GB
swap: the rest of spare space.

No desktop environment will be installed.
Once the system is installed, we realize that we would be very just of space.
Extending the disk
# Partitioned
Add a disk to your 10GB system.
Partiate this disk, choosing the appropriate size for each of the partitions, keeping in mind that each partition will be assigned to a directory of those indicated:
/ boot / efi FAT32 efi partition - > 100MB / ext4 - > 8GB
/ home ext4 - > 1GB
/ var ext4 - > 400MB
/ usr ext4 - > 400MB
swap swap - > 200MB

Giving file system to partitions
To format this partition / boot / efi FAT32 partition efi - > 100MB

For these partitions I will give you ext4 format: / ext4 - > 8GB
/ home ext4 - > 1GB
/ var ext4 - > 400MB
/ usr ext4 - > 400MB

To give swap format: swap swap - > 200MB

To “activate the swap” - > sudo swapon dev / vdb6 and then to make it permanent add to / etc / fstab.
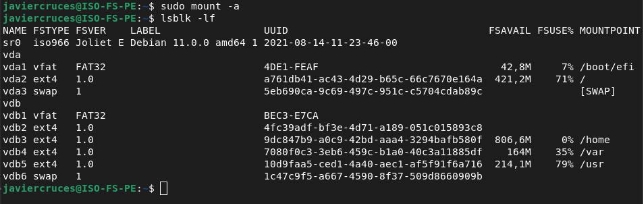
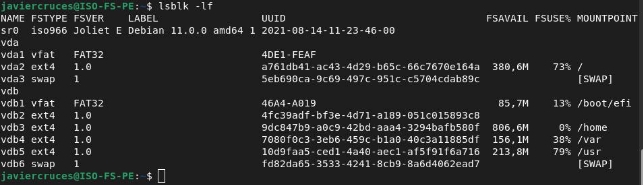
We would have the disk with the following formats:

Data migration
# EFI partition
Below we will make a reliable copy of each of our partitions for it, create a directory to mount each disk in a directory with its name:

And we’ll ride the partitions in these directories:

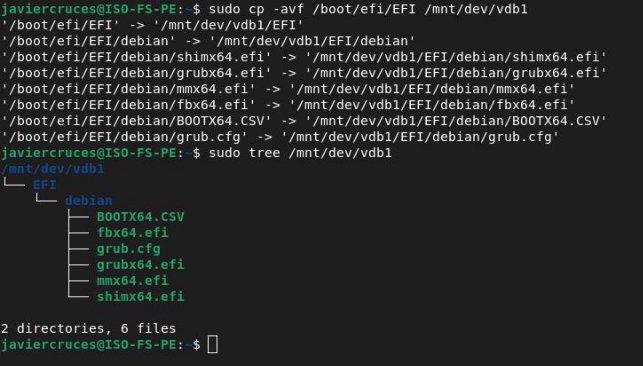
We will begin to pass the information of our partitions. It is important to use the parameter a (same as dpR) that allows to make the copy recursively in addition to the permissions and links found in the system are kept intact. With parameter f, we force the copy.
Copy of the EFI partition:
# HOME partition
We’ll set it up in any directory, then we’ll copy it with rsync and with the diff command we’ll check if there are different files in the directories to save us from doing the check manually.

Now we’ll add it to the fstab:

We ride it with a mount -a. We dismount it and we delete the home directory of the old disk:


# VAR partition
We’ll set it up in any directory, then we’ll copy it with rsync and with the diff command we’ll check if there are different files in the directories to save us from doing the check manually.

Now we’ll add it to the fstab:

We mount it with a mount -a. We dismount it and we will delete the var directory from the old disk:

USR partition
We’ll set it up in any directory, then we’ll copy it with rsync and with the diff command we’ll check if there are different files in the directories to save us from doing the check manually.


Now we’ll add it to the fstab:

We ride it with a mount-a:
We disassemble it and delete the home directory from the old disk:


And we’ll ride them back with a mount-a.
# RAIZ partition
We’ll set it up in any directory, then we’ll copy it with rsync and with the diff command we’ll check if there are different files in the directories to save us from doing the check manually.
Excluding the directories we’ve separated before:


Now we’ll add it to the fstab:

To mount this partition we must restart the system.
Generate the new EFI
For this we have to follow a different procedure, the first thing we will do is give fat32 format to the partition. Then just like the others we’ll set it up and install a new grub by specifying where we want to install it, on the second disk.

Now we’ll add it to the fstab:

We will restart the equipment and check that it works:
We will now update the grub:
 Ahora para construir el nuevo efi tendremos que a través de un cd live o desde el modo rescate construir un nuevo grub :
We mount our new system partition and give you to reinstall the grub boot charger:

Once this is done, we turn off the machine and put the second disk first and the boot order and reboot the equipment:

When we restart we choose the first option that is vdb boot:
And we will have managed to migrate the system to a larger disk:! […] (/ img / Asposer.Words.b81bc7a-b593-45c4-8e4d-c913a16c26ef.034.png)
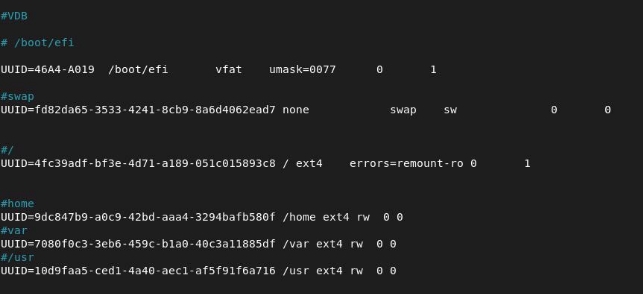
My / etc / fstab has been as follows:
Bibliography
- [To migrate from one disc to another] (https: / / www.dragonjar.org / migrar-installation-de -linux-a-a-a-partition-o-disco-diferente.xhtml)
- [Copy partitions] (https: / / juncotic.com / partitions-copying-installation-linux /)
- [Recover grub] (https: / / lihuen.linti.unlp.edu.ar / index.php / Gu% C3% ADa _ of _ installation% C3% B3n _ or _ recovery% C3% B3n _ of _ GRUB)