
Francisco Javier Cruces Doval
Friday, September 8, 2023 | 19 minutes
Installation GNS3 and Wireshark in Debian
**This post was developed for Debian 11. If you have a more recent version, you can review the Debian 12 post you will find in the network section of the same page. The only part you should not follow if you meet this condition is the installation of GNS3. The rest of the content is still valid.
 –>
–>
1. Introduction
Wireshark is a protocol analyzer used to analyse and solve problems in communications networks, for data and protocol analysis, and as a didactic tool.
Add a graphic interface and many organization and filtering options. So, it allows you to see all the traffic that passes through a network by setting the configuration in promiscuous mode of our network card. It also includes a text-based version called tshark.
It allows you to examine data or a saved capture file on disk. The information captured can be analysed through the details and summaries for each package. Wireshark includes a complete language to filter what we want to see and the ability to show the reconstructed flow of a TCP session.
Wireshark is free software, and runs on most Unix and compatible operating systems.
The minimum requirements for using this software are:
- Any modern AMD64 /x86-64 64 bit or 32 bit x86 processor.
- 500 MB RAM available. The larger capture files require more RAM.
- 500 MB of available disk space. Capture files require additional disk space.
- Any modern screen. A resolution of 1280 × 1024 or more is recommended. Wireshark will use HiDPI or Retina resolutions if available. Advanced users will find several monitors useful.
- A compatible network card to capture
1.1 Download the package in due
To download the package on our computer we will need to look at the official page downloads if it includes support for our operating system.
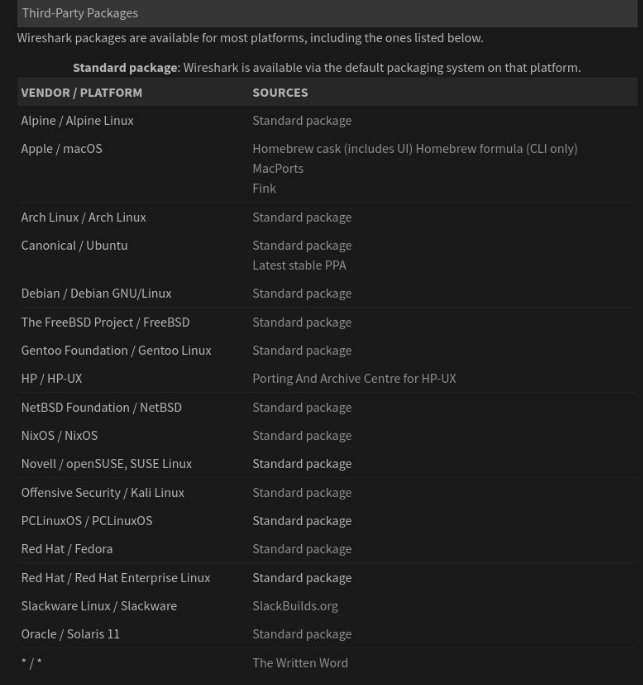
We see that no GNU/Linux operating system appears on the list, this is because Wireshark is available through the default packaging system on most of these platforms. That is to say this present in the repositories of our distribution, in the event that it is not there we have the source code as a free software and we could compile it.
We can check if it is available in our operating system by visiting the official page:
We see that Debian appears on the list this means that the package is in the official repository of due.
In Debian we have the apt package manager, so we can check the version of the package available for installation and check from when repositories are downloaded with the following command:

To perform the wireshark installation we will enter the following command:

Then to make network catches on the equipment we will need permissions for our user to do so, we will use the following command:

1.2 Operating check
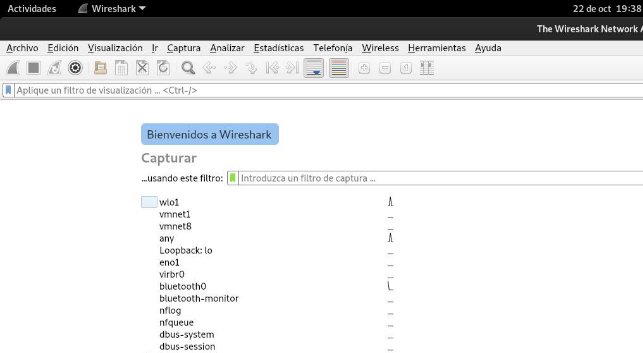
We will now open the program to check that everything works properly:
Now we will start a package capture for it if we want to do it on a specific interface we press on it, in my case I will use the wlo1 wireless network card and I will make a web request to the jagger.es page.
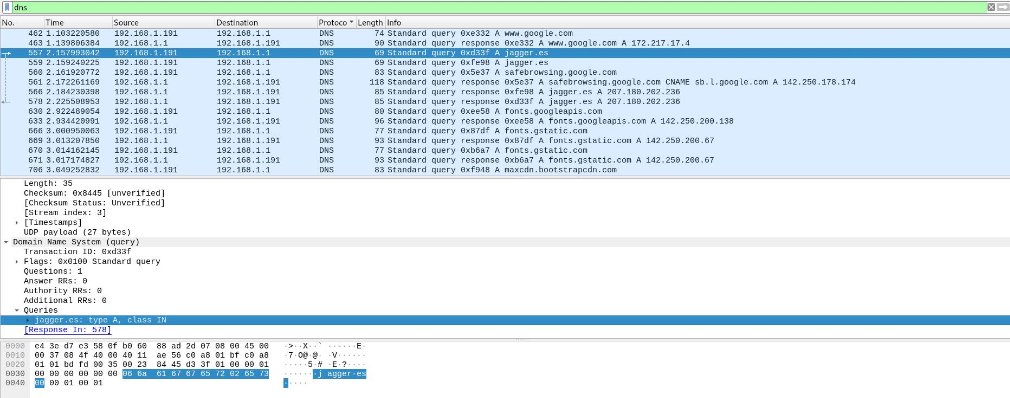
Here I show you the DNS request that has traveled from my laptop to the router.
1.3 General wireshark components
Wireshark makes use of certain packages:
- **Wireshark:**the network protocol analyzer we all know.
- **TShark:**a command line network protocol analyzer.
- **Supplements and extensions:**extras for Wireshark and TShark dissection engines
- **Dissector supplements:**supplements with some extended dissections.
- Complements of tree statistics: Extended statistics.
- **Mate:**monitoring engine and meta analysis: user-configurable extensions of the screen filter engine, see Chapter 12, MATE for more details.
- **MIB **of SNMP: SNMP MIB for a more detailed SNMP dissection.
- **Tools:**additional command line tools to work with capture files
- **Editcap:**reads a capture file and writes some or all of the packages in another capture file.
- **Text2Pcap:**reads an ASCII hexadecimal overflow and writes the data in a pcap capture file.
- **Reordercap:**reorders a capture file by time mark.
- **Mergecap:**combines several captured files saved in a single output file.
- **Capingos:**provides information about the capture files.
- Rawshark: unprocessed package filter.
- **User guide:**local user guide installation. The Help buttons in most dialog boxes will require an Internet connection to show the help pages if the User Guide is not installed locally.
2 Installation of GNS3 in Debian 11
2.1 Introduction
GNS3 is a graphical network simulator launched in 2008, which allows you to design complex network topologies and launch simulations on them, allowing the combination of both real and virtual devices.
To complete simulations, GNS3 is closely linked to:
- **Dynamipes:**an IOS emulator that allows users to run IOS images.
- **Dynagen:**a text-based front-end for Dynamips.
- Qemuand **VirtualBox:**to allow the use of virtual machines such as a PIX firewall or workstations.
- **VPCS:**a PC emulator with basic networking functions.
- IOU:(IOS in Unix), special IOS compilations provided by Cisco to run directly on UNIX systems and derivatives.
The minimum requirements for making use of this tool are:
- **Processor:**2 or more logical cores
- **Virtualization:**Virtualization extensions are required. You may need to enable this through your computer’s BIOS.
- **RAM memory:**4 GB RAM
- **Storage:**1 GB of available space (Windows installation is < 200 MB).
- **Additional notes:**You may need additional storage for your operating system and device images.
2.2 Installation
The first thing we will do before we install will be to check that our system is up-to-date, so we will make an apt update and if we have outdated packages we will make an apt upgrade.
Below we will install all the units you need GNS3:

I will now describe the function of the packages that we will install:
| Package | Description |
|---|---|
python3-pip | The pip module is the package installer for Python. |
python3-pyqt5 | The PyQt5 module exposes the Qt5 API to Python 3. |
python3-pyqt5.qtsvg | The PyQt5 SVG module provides classes for displaying the contents of SVG files. |
python3-pyqt5.qtwebsockets | The PyQt5 WebSockets module provides Python 3 bindings for the WebSockets specification (both client and server). |
qemu | Virtualization software, currently divided into several packages. |
qemu-kvm | Full system emulation binaries for QEMU. |
qemu-utils | Utilities for QEMU emulation. |
libvirt-clients | Libvirt is a set of C tools for interacting with the virtualization capabilities of recent Linux versions. |
libvirt-daemon-system | This package contains configuration files to run the libvirt daemon as a system service. |
virtinst | This package contains command-line utilities for creating and editing virtual machines. |
wireshark | A network analyzer that captures packets for further analysis. |
xtightvncviewer | A remote display system that allows you to view a ‘desktop’ environment not only on the machine where it is running but from anywhere on the Internet. |
apt-transport-https | This is a dummy transitional package: support for HTTPS. |
ca-certificates | Contains the certificates of the certificate authorities included in the Mozilla browser to enable SSL-based applications. |
curl | curl is a command-line tool for transferring data with URL syntax. |
gnupg2 | Can be used to encrypt data and create digital signatures. It includes an advanced key management feature and complies with the proposed OpenPGP Internet standard. |
software-properties-common | Allows you to easily manage your distribution and software sources from independent software vendors. |
Once these packages are installed, we will download GNS3 using pip3:

We will also look at the command output to check for any errors:

The following will be to install docker, which will allow us to create containers. For this we will import your GPG key so that our system trusted the:

The following will be to add the repository to our system for this we will use the following command:

We will update the repositories you use apt by making an apt update:
And we can finally install docker:

Add the following lines to your /etc/apt/sources.list, so that we can install dynamps and ubridge:

In order to install the necessary packages of these repositories, we will add the gpg keys of it:

We will update the repositories you use apt by making an apt update:
We will install the Dynamips and ubridge packages:

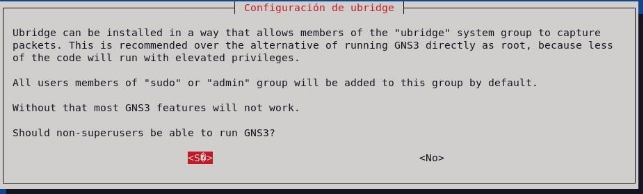
A box like this will come out to indicate if users who are not superusers can capture packages, we will tell you that if in our case:
To avoid accidental installation of anything else in that repository (for now), delete or comment those two lines in your /etc/apt/sources.list file and make an apt update:

We can also remove the GPG key from these repositories if we want to:

We will add users who will use the tool to the following groups:
Reset your user session by closing and relaunching it, or by relaunching the system to apply these changes.

2.3 Our first topology in GNS3
Once the system is restarted, we will start the application, and we will get a box like this:

Here we will indicate that I will run the applications locally in my machine. Below we will select the server route, host name and associated port:

If everything has been right, he will tell us that it has been done correctly:

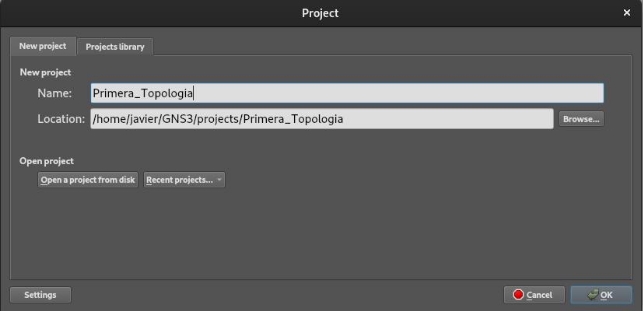
When we open the program, it will give us a choice to create a project or we can create a new one, in my case I will create one:
If we look at the left side of the program, we will see the following symbols, which serve the following purposes:

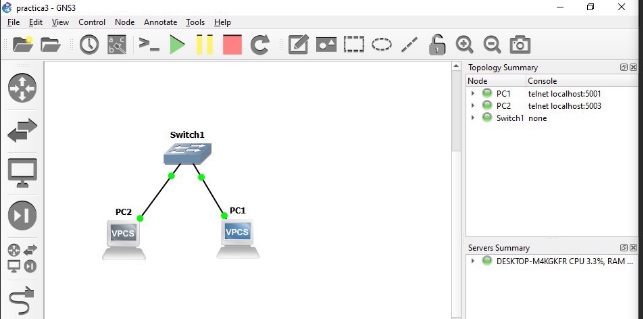
We will add by dragging 2 VPCS:

We’ll add an Ethernet swicht:

We will click on the Add a link button to stop adding links, so we would have the scenario:

We can make visible the interface to which we have connected them by clicking on the following button:

The green “Play” button in the GNS3 toolbar will power on all devices in the topology, while the yellow “Pause” button will suspend them, and the red “Stop” button will power off everything in the topology.

We’ll get a warning, so we can confirm if we want to add all the devices, we’ll give you if:

We will see that both left in the device summary and in the outgoing connections of the devices their state “light” to changed from red to green, since these are now on:


We will now open a terminal on all of our VPCS with the following button:

Through these terminals we will assign ips addresses to our devices with the following command:


Once the network cards are configured, we will check for connectivity between them by doing a ping:


We will add a third VPCS to our scheme:

We will turn it on and open a terminal to configure it as we have done with the above:

And I’ll check that this new machine has connectivity to the above:

If we want to save our equipment settings we will enter the save command:


2.4 Internet access via NAT on GNS3
The easiest way to get access to the Internet is through the NAT cloud.

This has Internet access as well as a DHCP service running with IPV4. To make use of it, we will put it on our stage and connect it on a swicht.

Then if we want to get out on the Internet, we will have to set up our customers to get them the right network configuration. We’ll take advantage we have a DHCP server.
For customers to configure through this service we will enter the dhcp command:

We’ll try to do a ping to google.es to check the connectivity:

3 Common problems in installation
3.1 VPCS error exectable version must be > = 0.6.1 but not 0.8
This error comes when installing the VPCS, a version that does not currently support the program is downloaded from the repositories.

Luckily it is very easy to solve, we will access the repository of the developer in github and we will download the following package:

Once downloaded we will uncompress it using the following command:

Where we do this command will create a directory in which we will access to compile the program:

We will run the following script:

The vpcs directory will create us on this route, this one will have to be added in gns3:

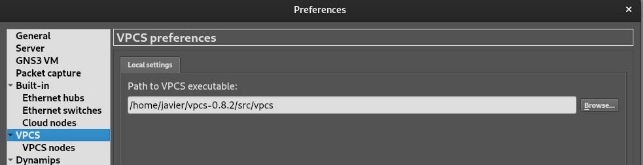
We will access gns3, press CTRL + SHIFT + P to access the preference panel. Once here we move to the vpcs section and select the directory route we just generated:
We applied the changes and we could already use the vpcs.
3.2 Xterm not installed

This error appears when we want to access a console of a device of our network typology. To solve this problem the first thing is to close GNS3 and then direct to a terminal to download it, we will use the following command:

We’ll reopen the program and we can access the consoles of our machines.
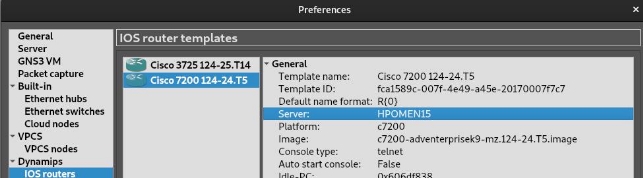
4 Install IOS images
If we want to add to our real hardware system as can be a swan router for example we must access the official GNS3 page and download specifically the one we want to add in my case I will add a swan 3725.
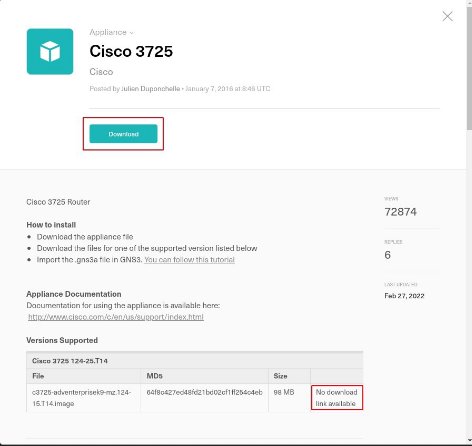
If we click on the download button we will download an extension file, which is a template.

If you look at this case we do not have the possibility to download the image from this repository, it tells us that there is no link available. For these cases there is a cisco repository which has all the images of its products –> tfr.org/cisco-ios
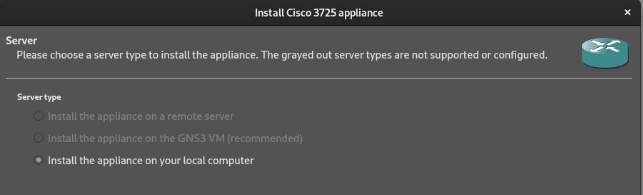
To find out which one to get from here, we will open gns3 and through the top left menu we will click on the file > import applilance section, select the template that we will import. We will give you to install on our local computer:
Once here we are, we will see the name of the file and search it in the external repository, as we can see that the file is not found

In this case I will download, this version that matches the template I have downloaded:

When we have done this we will have the following problem, the image signatures will not match to mitigate that step we will mark the option allow custom files at the bottom and import the binary we have just downloaded:

Please inform us that for the selected template, the file we downloaded from the repository does not match the hashes. In our case it is normal since the image is not the same as it would have to come with the template, so we will accept the risks.

We’ll see you change the state to ready to install, so we’ll give you the next on the bottom.

You will ask us for confirmation to add our device, we will confirm the action:

Please inform us that our device has been added to the router templates for this case.

Also inform us of the name given to you.

As I tell us, we’ll find it in the routers section:

Now we’ll do a little running test, add it to our stage and check that we can start it and connect to the console:

‘We’ll see the connection to the console is correct:

5 Installation on GNSS Windows
5.1 Packages needed for Windows
Even if we have installed the GNS3 software it will make use of additional packages to perform some functions or even add new features such as emulating routers of certain manufacturers.
| Article | Required | Description |
|---|---|---|
| WinPCAP | Required | Required to connect GNS3 to your computer network. Used by Cloud and NAT nodes to allow your projects to communicate with the outside world. |
| Npcap | Optional | The modern replacement for WinPCAP, known to solve issues but is less tested than WinPCAP. Install Npcap with the “Support WinPcap API mode” option selected if used without WinPcap. Npcap can coexist with WinPcap if that option is not selected. |
| Wireshark | Recommended | Allows you to capture and view network traffic sent between nodes. |
| Dynamips | Required | Required to run a local GNS3 installation with Cisco routers. |
| QEMU 3.1.0 and 0.11.0 | Optional | Virtualization software. The older version of Qemu 0.11.0 is installed to support legacy ASA devices. It is recommended to use the GNS3 VM instead. |
| VPCS | Recommended | A very lightweight PC emulator that supports basic commands like ping and traceroute. |
| Cpulimit | Optional | Used to prevent QEMU from using 100% of your CPU (when running) in some cases, such as with legacy ASA devices. |
| GNS3 | Required | The main GNS3 software. This is always mandatory. |
| TightVNC Viewer | Recommended | A VNC client used to connect to device graphical user interfaces. |
| Solar-Putty | Recommended | The new default console application. |
| Virt-viewer | Recommended | Alternative viewer for Qemu desktop virtual machines that have qemu-spice preinstalled. |
| Intel Hardware Acceleration Manager (HAXM) | Optional | Only available on systems with Intel CPUs (and VT-X enabled) that are not using Hyper-V. Used for hardware acceleration of Android emulation as well as QEMU. |
5.2. Minimum requirements
For small environments on Windows developers require to have at least the following features:
| Feature | Requirements |
|---|---|
| Operating System | Windows 7 (64-bit) or later |
| Processor | 2 or more logical cores |
| Virtualization | Virtualization extensions are required. You may need to enable this in your computer’s BIOS. |
| Memory | 4 GB of RAM |
| Storage | 1 GB of available space (Windows installation is < 200 MB). |
5.3 GNSS 3 installation
The first thing that we will have to download the official executable of your website, for this we will have to be registered in advance.
We will launch the executable and ask for the permission of the administration, we will grant them:

A screen will come out informing us about the product, we give it to next.

We will then have to accept the terms and licences for use:

You will ask us where we want to create the shortcuts of the program, I will leave it by default as this will add them to the desktop:

Next, we need to pay close attention because we must select local installation and all the packages we intend to use. If we have already installed any of them beforehand, we should uncheck them (those mentioned in section 5.1).

We will select the route where the program is installed, I will leave the default. It also informs us of the space required by the installation:

We will wait for the installation:

WinCap installation
Required to connect GNS3 to your computer network. Used by the Cloud and NAT nodes to allow their projects to communicate with the outside world.
As the installation of GNS3 is carried out, the installation of all the programs we have previously marked will begin.
It will show us information about the program this first window so we give you the following:

We accept the license of terms and use:

We mark the option for you to automatically boot the driver and we give you to install

It informs us that the installation was correct and we close the window:

Ncap installation
The modern WinPCAP replacement can solve problems but is less proven than WinPCAP.Instale Npcap with the selected “WinPcap API-compatible mode” option, if used without WinPcap.Npcap can coexist with WinPcap, if that option is not selected.
Again the same process, we accept the terms and licenses of use.

We leave the default marked option and give it to install

When the installation is finished we give you the following:

And we close the installer:

We return to GNS3 because the installation process was paused while we installed the components it will use. It will resume automatically.

Once the installation is finished, we give you the next

GNS3 offers us a free Solarwinds license, we will give you if:

We will have successfully completed the installation of GNS3

We will open the program and select to run the devices in our local machine:

Here we will configure our local GNSS server 3

Previously leave it by default, if our configuration is correct, it will tell us that the connection has been performed successfully:

It will show us a summary of the configuration given above:

5.4 Operating test
We will set up the same scenario as in debian to check its operation, the process is the same.
We will set up the ips addresses of the machines and check that they have connectivity through solarputty.
PC1:

PC2:

We can see that both teams have connectivity across the stage.
6 Wireshark installation on Windows
6.1 Installation
The installation of this product is very simple, if we have installed GNS3 previously and marked the box of this, we will have been installed automatically.
On the contrary, if we start from scratch we can do your installation, let’s get it off your official website:

When we open the installer you will ask us for administrator’s permissions, we will grant it to you:

If, like I installed it with GNS3, we were to find that there is already one installed, so I will cancel it.

If we didn’t have it the installation is identical to any program we have installed in practice. Here I show you, the first thing you’ll see is an executable information screen:

Like all programs you will be asked to accept the terms and conditions of use:

We will select the products we want to install in my case all:

It will also ask us to access them directly and where we want to create them.

We will select the route where we want it to be installed:

We will select if we are interested in the Ncap package. (We have installed it with GNS3)

Next you will ask us to install the extension that allows us to analyze USB traffic, in my case the desmarcare as I am not interested.

We will wait for the installation to complete and give you the following:

Please inform us that the installation has been properly performed:

6.2 Operating test
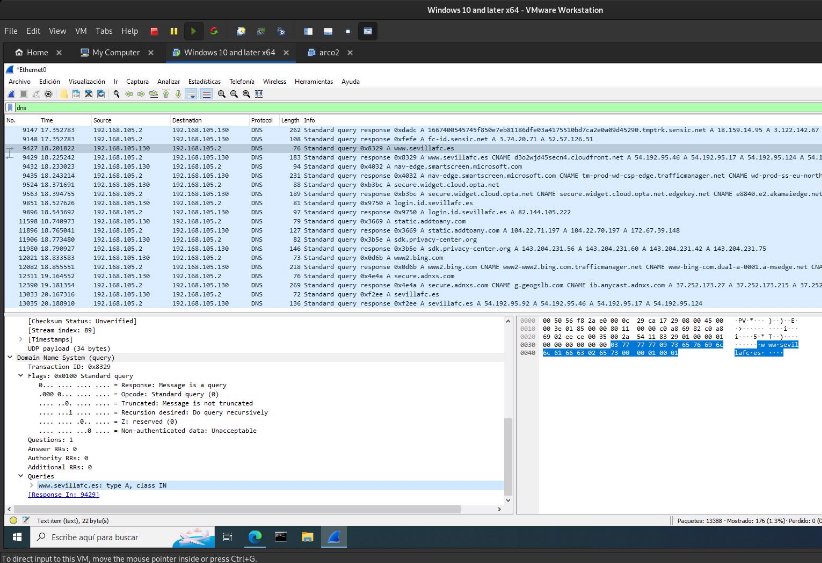
I have made a DNS request to www.sevillafc.es and here we can see the DNS consultation:
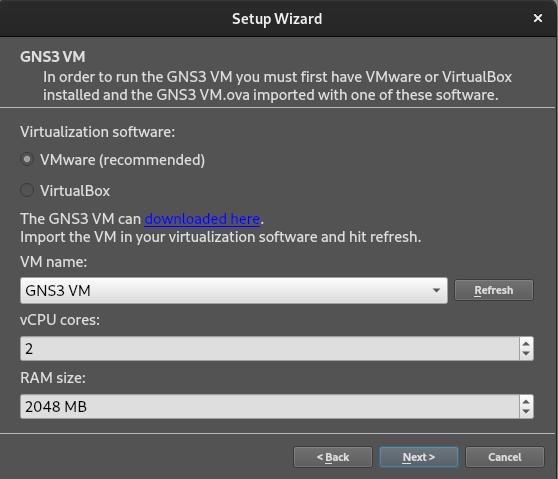
7 GNSS VM
If we want to deploy virtual machines in a virtual instance we will deploy the virtual machine that gives us GNS3 to carry the Virtualization charge.
We will download the OVA from the official website

Once downloaded we will import it into Vmware and give you the hardware features we consider appropriate:

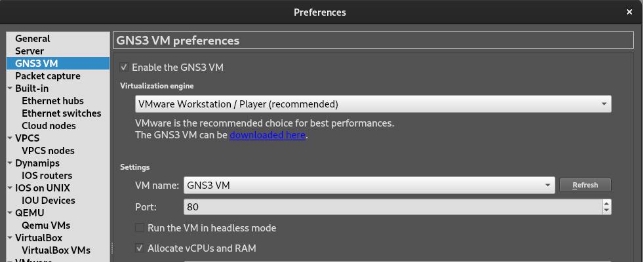
Once I do this we will open GNS3 and edit the preferences of GNSS VM and select the virtual machine that we just imported:
We will start the virtual machine and we can see the data from it in the info tab:

We will launch the set-up wizard from the GNS3 help tab and select the option to run the stacks in a virtual machine:

We will select the configuration of our virtual machine:

We will again select our virtual machine and the hardware features we want:
We would only have to import the devices into the virtual machine, this does just like we did before changing the place where we imported it:
If we want to see where a device will run we can see it through preferences:
We can also see in section servers sumarry the resource consumption of our machines:

8 Conclusion
We can see that the installation is infinitely more comfortable on Windows as it automatically installs your dependencies, being the typical “next to next” installation.
Also on Windows when the installation was finished the product was ready to use and I have not suffered any errors when starting the program or using its features as if it happened to me in Debian.