
Francisco Javier Cruces Doval
Friday, September 8, 2023 | 23 minutes
Network monitoring commands
A document in which the main commands are detailed when it comes to detecting and solving network incidents.
Windows Command
Explains the meaning of the different parameters to be configured in the TCP / IP Properties in Windows
We have to keep in mind that every configuration we make is independent for each of our network adapters.
To access these parameters we will follow the following route in our system:
Control Panel > Network and Internet > Network and Sharing Center > Change adapter settings:

Once here we will right-click on the adapter, select Properties, and then choose Internet Protocol Version 4 (TCP/IPv4):

Once here we will see two tabs to which we can turn to configure our card; in the General tab we can see the following sections:
The first subsection (General) relates to our IP address:

- Obtain an IP address automatically: * * This option uses the DHCP service to dynamically assign the IP address, subnet mask, and default gateway.
- Use the following IP address: * * Here we will manually enter the desired network configuration:
- IP address: * * is a numerical label that identifies our machine in a unique way on our network, it cannot be repeated.
- Subnetwork mask: * * numerical set whose function is to indicate to devices which part of the IP address is the network number including the subnetwork, and which part is the host.
- Default link door: * * It is the default IP address that is assigned to a team to send the packets to other networks.
In the second section of this tab we will make the configuration concerning DNS servers, which will allow us to translate names into IP addresses to be able to navigate.

- Get the DNS server address automatically: * * This option will make the address come from the DHCP server we have configured on our network.
- Use the following DNS server addresses: * * This option serves us to manually select the IP address of our DNS servers:
- Preferred DNS server: * * The address we put here will be the first to consult in case you need to make a resolution.
- Alternative DNS server: * * If the primary server failed or was down at that time, we would go on to use the secondary.
In the alternative configuration tab, it is designed for equipment that needs to be used in more than one network, usually seen in professional environments:
- Automatic private IP address: * * will make use of the DHCP server to configure.

- User-configured: * * Let us manually enter the configuration (I will omit the fields explained above):
- Preferred WINS: * * is a Microsoft name server for NetBIOS, which maintains a table with the correspondence between IP addresses and NetBIOS computer names.
- Alternate WINS: * * If the primary server failed or was down at that time, we would go on to use the secondary.
Utility of the ping command
Ping is a command or diagnostic tool that allows a state-of-the-art verification of a particular connection of a local host with at least a remote computer in a TCP/IP type network; it is the most well-known network diagnostic tool.
The most common uses of this tool are:
- Check network connectivity.
- Measure the latency that takes two points to communicate.
- Know the IP address used by a domain name.
- Scripts that allow you to keep a record of the availability of a remote server.
- Scripts that allow you to know when there is connection on a computer.
To make use of this we will open a cmd, press WIN + R and write cmd.
General use of Ping
The simplest ping syntax is as follows: ping [Parameters] [IP / Name]

If we look at the command output we see that it allows us to know:
- IP address * * corresponding to the name of the remote machine.
- The ICMP sequence number * * (“Code that returns us, ej: 0 = inaccessible network”).
- TTL * *: Life time in seconds; as this value is decreed in each machine in which it is processed, it must be at least equal to or greater than the number of jumps it will give. If ever this number is zero, the router will interpret that the package is traveling in circles, therefore, it ends the process.
- Latency: * * corresponds to the time period in milliseconds that is needed to take a turn between the source and destination machines. As a general rule, the delay of a package should not exceed 200 ms.
- ping statistics: * * Collects all the information showing us the lost, sent and received packages. It also shows us the package with lower latency and greater as well as an arithmetic mean.
PING -T
This parameter will allow us to do an infinite ping that is not to end until we kill the process, if we did not put it by default only 4 traces were sent. To complete this execution of this command we will press CTRL + C.

When we stop the execution you will show us the statistics you have collected, packages sent, packages received and packages lost as well as the average back and forth times.
PING -A
This parameter serves to solve an ip in a host name, printing a line indicating the host name to which the tracks are being directed, allowing us to identify the machines more easily:

PING -N
This parameter is used to specify the number of requests that we want when sending packages, this will indicate it with a number between 1 - 4294967295.
For example if we want to send 10 traces the command would be as follows:

We can check at the bottom that you have sent in number that we have indicated.
PING -L
It allows us to change the byte size of the packages sent, we will need to specify a number between 0 and 65000.

PING -F
This parameter serves to prevent packages from fragmenting, the maximum size of unfragmented packages is 1472 bytes.
We can see that if we get over this number, it will give us a mistake by informing us that it is necessary to fragment the package:
PING-I

This parameter allows us to specify the maximum number that can be given to reach the destination, the maximum value that we can enter 255.
When we specify a TTL this sets the maximum number of jumps, by passing through a new device (a router) this discount 1 to the TTL specifying until it reaches 0, in this case the destination will be shown as unattainable, thus preventing a package from travelling through the network indefinitely looking for a destination that may not exist.


PING -4 -6
Ping -4: Force the host response specified with an IPv4 address. It is necessary that both the equipment that launches the ping and the destination have a correct IPv4 configuration.
Ping -6: Force the host response specified with an IPv6 address. It is necessary that both the equipment that launches the ping and the destination have a correct IPv6 configuration.
Check connectivity in a network
We will perform a series of tests to check the operation and find errors. The first thing will be to make ourselves ping for it:

If the output is correct this shows that our network adapter works properly.
We’re going to ping a machine on our local network, so we’ll show that the physical connections are correct:

We are going to do ping to the gateway, if successful it shows that there is connection to the computer that provides the Internet:

We will ping to an Internet site using ip, to check that we have Internet connection:

Finally, doing ping to an Internet domain, if successful, shows that there is Internet connection and the DNS servers configured in the connection work correctly:

General use of the ipconfig command
This command is used to view the current configuration of our computer’s network adapters, an example of general command use is as follows:

This shows us the following information:
- Description of the adapter * *: Name of the adapter or network card used in the connection.
- IPv4 address: * * It’s the IP address assigned to the team on the local network.
- Default link door: * * It is the IP address of the computer provides Internet access.
- DNS servers: * * IP addresses of the servers responsible for resolving domain names to IP addresses. There are usually two, the main and the secondary.
- DHCP State: * * Dynamic host configuration, in the case of the equipment shown is enabled, that means that an IP address assigned by this service will always be used.
From these parameters we can consult the adapter information or identify an inconsistency in its configuration.
IPCONFIG / ALL
It will return all available information from the network adapters, it is a more detailed output than if we omitted this parameter, with this we can consult DNS servers and MAC addresses.

IPCONFIG / RELEASE
It is used to release an IP address in the DHCP service; we will not be reassigned one until we run ipconfig /release

We can specify the adapter from which we want to release the ip by writing it then, if we omit the name apply them to all.
EJ: ipconfig /release Ethernet0 -> Only release the IP from the Ethernet0 adapter. If we want to release an IPv6 address we will use the parameter /release6.
IPCONFIG / RENEW
Once the previous command has been executed, we will have to run this to ask the DHCP server for a new IP address.

We can specify the adapter from which we want the DHCP offer to be renewed by writing it below.
EJ: ipconfig /renew Ethernet0 -> It will only renew the Ethernet0 adapter. If we want to renew an IPv6 address we will use the parameter /renew6.
IPCONFIG / FLUSHDNS
It is used to empty the DNS resolution cache from our local team, usually used when we want to check the proper operation of the DNS server.

IPCONFIG / REGISTERDNS
Update all DHCP concessions and re-register DNS names. This command is oriented to work in domain environments and to updating the dynamic records of the DNS server in which it is running, taking into account that if it is blocked in some way the dynamic update will not be done.

IPCONFIG / DISPLAYDNS
This command simply shows us the DNS queries that are stored in the cache of our system as shown in the image, show data from IPv4 and IPv6 protocol records.

IPCONFIG / SHOWCLASSID
This command allows us to check the user classes configured on our DHCP server and that will be available to different customers.

\ * If we want to check for IPv6 we will use the / showclass6 parameter.
General use ARP
The arp command shows and modifies the IP address conversion tables in directions
MAC using the address resolution protocol (ARP).
ARP-A
Ask for current protocol data and show current ARP entries. If inet\ _ addr is specified, only the IP and physical addresses of the specified equipment are shown. If there is more than one network interface using ARP, the entries of each ARP table are shown.

The -g option does the same function:
As shown in the screen capture, the arp-a command lists all the devices currently in the host ARP cache, including the IPv4 address, the physical direction and the type of direction (static / dynamic) for each device.
If we want to delete the cache arp we will use the -d option followed by the\ * wildcard to delete all the entries in this table, if we would just want to remove a query we would put the IP address.

We can request the MAC of an address using arp + IP of the device and then see it on our table with arp -a.

General use netstat
The netstat command generates visualizations that show the state of the network and protocol statistics. The status of TCP, SCTP and UDP final points can be viewed in table format. Information about the routing table and interface information can also be viewed.

NETSTAT -A
It shows all the connections and listening ports of our team, as well as the state of the port and the remote direction which is using the same:

NETSTAT -B
It shows the executable file involved in creating each connection or listening port.
NETSTAT -E


It shows us statistics on network interfaces, it serves to see the activity that has had this:

NETSTAT -R
It shows us the routing table, so we can see the sites our team is able to reach through the network:

NETSTAT -N
It shows us the active connections with a table format, similar to the parameter - only that it indicates the port number instead of the name.

NETSTAT -O
Similar to the above parameter but this one adds the process PID:

NETSTAT -P
It allows us to filter connections according to protocol (TCP, UDP, tcpv6 or tcpv4…)

NETSTAT -T
Shows the current connection’s download status:

Netstat is very interesting to see statistical data on the connection, but it will also be very useful to analyze the open ports at a given time and thus identify problems. It is essential for certain applications and to achieve optimal performance.
General use nslookup
It is an application included in all Windows systems, to consult, obtain information, test and solve problems with DNS servers.
By invoking it without specifying any parameter, it will return the name of the default DNS server and its IP address:

The command has two modes of use, the traditional through command line and the interactive. We can use it to solve address names from the terminal by putting nslookup followed by the name we want to solve:

We can also do reverse consultations, that is, through the ip tell us the name:

For example we can select the type of DNS records to make requests which are:
- A: * * to search for A records that are related to the IPv4 address..
- AAAA: * * to search for AAAA records that are related to the IPv6 address. If a web uses IPv6 and so do we, then we will have to indicate this DNS record.
- PTR: * * to look for reverse records.
- MX * *: to search for Mail Exchange records of the mail.
- TXT: * *, to search for text records such as SPF or DKIM.
- CNAME: * * to search for domain aliases, this is also known as subdomains, for example, the “www” is always a main subdomain “or the typical” ftp. “which is also a subdomain.
To change the registration type we use the set type = Registry name, for example:

We can also choose the server from which we consult as follows:

General use tracert
It serves to map the route that makes an incoming package that comes from a host or network point to your computer, so we know where our trip is.

Saying one by one all the nodes and routers through which you pass the test message you sent, their IP addresses and the latency of each of them until they reach their destination.
There are some nodes that are not able to answer for that the spent waiting time entries.
We have some interesting parameters such as:
- -d: does not convert addresses to host names

- -h: allows us to select the maximum number of jumps

- -4 or -6: Force using IPv4 or IPv6:

- -w: allows us to specify the waiting time in milliseconds:

General use route print
The Route command is used to visualize and modify the routing table. Route print shows a list of current IP routes for the host. Route add is used to add routes to the table, and route delete is used to delete routes from the table.
So we can specify the way to reach a network or device.
The syntax is as follows: route [-f] [-p] [command [destination]] [MASK network mask]
Route print command without parameters to show all the contents of the routing table:

If we want to delete the routing table we must use the -f parameter:

In addition, we can add manual routes as follows:
→ route add IP\ _ Destination Mascara\ _ Destination Door\ _ of\ _ interface metric link

If we want to change a route, the syntax is the same as the previous command by changing the add-by-change command:

When we just want to remove a route, we will use the delete order followed by the destination:

How can you find out your router’s public IP?
There is a lot of way to know this from Windows, we can use the curl command to order the following web and return the ip:

Another way from the command line is to do a dns consultation with nslookup to the opendns service:

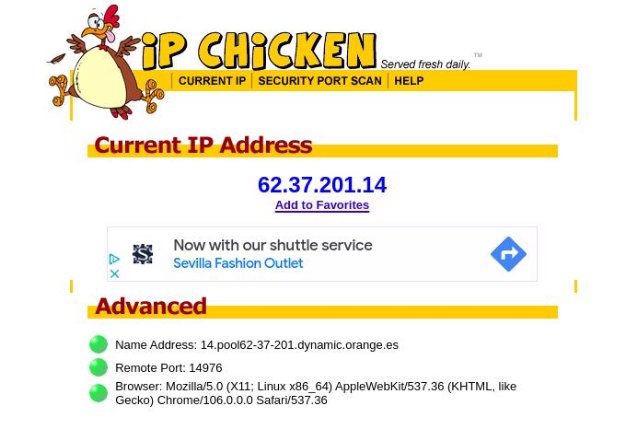
If we have a browser we can use one of the many websites that tell us the public ip address of the router, I use the following <https: ipchicken.com=”"></https:> :
Linux
Configure a network interface
To set up a Linux network card we can do it from the graphical interface or from the command line.
From the graphic interface we go to Settings > Wireless or Network. Once here we turn on the card and give the gear.
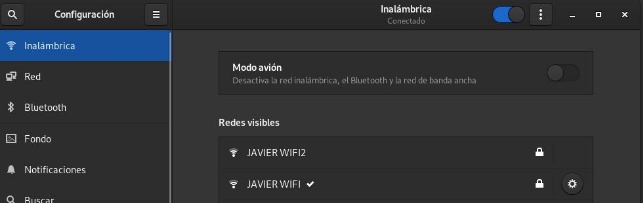
Once here we can manually configure the network settings of our card.
The same can be done from the command line by editing the / etc / network / interfaces file with superuser permissions.

Within this we can indicate the configuration of our network adapters, here I tell you with commented lines the basic parameters that we can indicate in this file.

Once we have configured our interfaces the changes will not be applied automatically, to do this we have several forms, the most comfortable is to restart the service:

Another way to change the DNS servers used is through the /etc/resolv.conf file

Here followed by nameserver we will put the address ip or name of our DNS server

General use ifconfig
* * Explains the usefulness of the ifconfig command from a real capture. Is there any information from which ipconfig /all is obtained that does not appear? Try to get it another way. * *
It is similar to ifconfig and is focused on the same functions, this command is also used to view, change and manage all current computer network configurations.
This is installed with the net-tools package, to install it:

To use this tool we will need to do it as a superuser, with its simplest use it will show us the basic TCP / IP configuration of our network card as well as statistics of it:
For example, with ipconfig /all we can see the configured DNS servers, which with ifconfig we can’t see.

So we’ll have to see the /etc/resolv.conf file

A common use of this command is to quickly set up a network interface, for example:

We can put this in one line.

We can also lift and download the network card

General use dhclient
This uses the dynamic host configuration protocol to dynamically configure the network parameters of the network interface.
The following command will tell dhclient to release the current concession it has from the DHCP server, i.e. we want to release the current ip. We will use the -r and -v parameters

If we want to reorder a network configuration to the dhcp command we will use only the -v parameter.

Mainly this command is used for this, to solve problems with DHCP service configuration.
Some parameters that I have not mentioned and may be useful are:
- -6: Serve to indicate you want IPv6
- -p: Serves to indicate another port to do the consultation
- -s: Serves to indicate the DHCP server address
Differences in netstat and ping commands with respect to Windows employees
netstat shows information about the network subsystem on our computer as well as Windows. If you look at the manual, it tells us that this application is partially obsolete. The replacement of netstat is ss, for netstat -r has ip route, for netstat -i can use ip -s link and for netstat -g has ip maddr.
If we launch the parameter we can see to the naked view that shows us more information without indicating any parameter, otherwise these are the same as on Windows.

While the ping command the difference is that it is by infinite default, unlike Windows this will not end until we stop it.

In this the parameters with respect to Windows change their “letter,” here would be:
- -i: Indicate the interval to send the next package in seconds (default is 1)
- -s: Change package size to bytes
- -f: flood, to test the network performance under a heavy load (send a lot of packages as quickly as possible)
- -c: indicate the number of traces sent
- -w: Stop printing the results after the indicated seconds
- -q: Remove the command output, quiet option
- -a: makes a sound when there’s an answer
- -V indicates the command version
The utility of this is still the same, solving problems of accessibility of hosts in a network. This helps us understand why a website is not loaded.
General use of the dig command
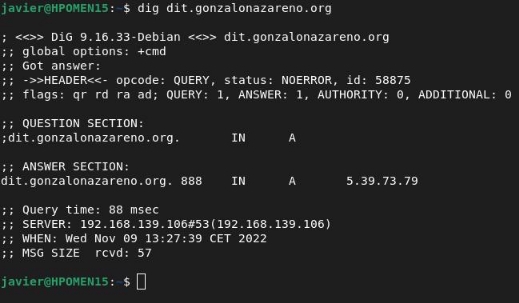
Dig is a command that allows you to consult DNS servers for information related to this service. To install it in our system, we will make an apt install dnsutils.
We can do a dns consultation, for example to the institute to check if we are able to get your address ip:
Using the +trace option, it does iterative consultations to solve the search for names. It will consult the server names from the root and then cross the namespace tree through iterative consultations following the references on the way:

We can also conduct reverse consultations with the -x option:

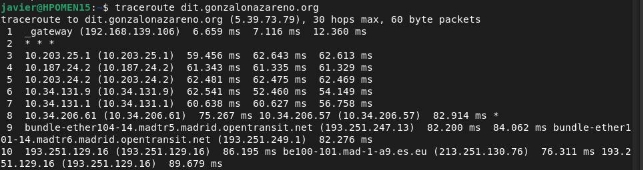
Linux traceroute command differences with Windows tracert command
The traceroute tool is exactly the same as the tracert, but it is called otherwise, although it can internally make use of different protocols, as in some operating systems the ICMP Echo Request / reply protocol is used, and in others it makes use of UDP messages directly to check how many jumps there are from one host to another.
These are used to detect where the error is when accessing a particular computer and to know where the “error” occurs.
Some parameters that may interest us are:
- -f,: Set the distance between the first jump and the next jump.
- -g,: allows us to indicate the gateway.
- I: Use ICMP ECHO
- -m,: Set the number of jumps; the default value is 64.
- -M,: the follow-up routes are carried out with ICMP or UDP; the default method is UDP.
- -p: Define the network port; the default value is 33434.
- -q: Define the number of packages per jump.
- -resolve-hostnames: you can use this syntax to correct the host names.
- -w,: Define the waiting time in seconds.
General use
Wget is a computer tool created by the GNU Project. You can use it to recover content and files from several web servers. The name is a combination of World Wide Web and the word get. It supports downloads through FTP, SFTP, HTTP and HTTPS.
To install it we use the apt install wget command.
An example is to download files, for example an iso. We would put the command followed by the url:

This will download the file to us in the current work directory.
We can use the command -or to indicate a different name when downloading the file:

Some interesting parameters are:
- -P: Indicate the directory where we want to save the file
- –limit-rate: serves to limit the download speed
- -tries: allows us to indicate the number of reattempts of the download
- -b: Make the download in the background
- -c to indicate that a discharge is resumed
If we wanted to download files from an FTP server we would use the following syntax: wget --ftp-user=user --ftp-password=password
General use of tcpdump
Tcpdump is a command line tool whose main utility is to analyze the traffic that flows through the network. Allows the user to capture and show in real time the packages transmitted and received by the network to which the computer is connected
The most common parameters are:
- -i allows to specify the network interface in which we are going to serve traffic.
- -c
It allows to limit the number of packages captured in a given number. - n Avoid resolution of ports and addresses ip to names. - e Show ethernet headers in addition to the ip package.
- t Do not print the capture time frame for each package.
- -x shows the hexadecimal content of the captured plot.
- -xx Idem to -x, but also shows the content of the Ethernet header.
- -X shows the hexadecimal and ASCII content of the captured plot.
- It just shows the ASCII content of the captured package.
- s
Show only the first - -vv Displays additional information, including parameters of protocol headers.bytes from the beginning of the package. - -w file Allows to save output in a file with pcap format.
- -r file allows you to read the packages previously captured and stored in a pcap file.
For example we can make a capture of our network of up to 50 packages:

As you see the output is indecipherable, to read it we will use the ngrep command to search for coincidences without taking into account capital and lower case.

General use of the arp command
The arp command will allow us to interact with the arp resolution cache, modifying it for example.
We can also find out the MAC address of a device, looking for it in the table:

The parameters are the same as we can find on Windows:
- -a: Find a particular address in the table
- -v: Shows all entries
- -n: Displays all entries in numerical form
- -d: removes a particular resolution
We can also do this with the ip command:

For this the basic syntax is as follows:
- add: Add resolution
- of: Delete resolution
- change: Change a resolution
- replace: replace a resolution
For example to add a table:

ip command
We can view and configure IP addresses, view and configure routing tables, view and configure IP tunnels, and also view and configure the physical interface.
This is added a “second command” to indicate your function, are as follows:
- link: it serves us to configure physical or logical network interfaces, for example, to see the status of all network interfaces.
- address: allows to view and configure the IPv4 and IPv6 addresses associated with the different network interfaces. Each interface must have at least one configured IP address.
- addrlabel: allows to add a label
- nearby: allows to see the neighborhood links, that is, you can see the ARP table of the operating system.
- rule: allows to view and configure routing policies and change them, this is used especially when you are going to set up several routing tables.
- route: allows to see and configure the routing tables, both of the main routing table and of the “secondary” that you configure.
- tunnel: allows to view IP tunnels and also to configure them.
- maddr: allows to view and configure the multilayer addresses.
- mroute: allows to view and configure the multicast routing table.
- mrule: allows to view and set up multi-direction routing policies.
- monitor: allows to monitor the status of network cards on a continuous basis, also IP addresses and routes.
- ntable: manages the neighbour cache (ARP)
- tuntap: manages TUN / TAP interfaces, oriented to VPN such as OpenVPN or WireGuard.
- maddress: configuration of the multicast addresses
- xfrm: manages IPsec policies.
- netns: manage network namespaces
- l2tp: L2TP configuration
- tcp\ _ metrics: manages TCP metrics.
- token: manages the identifiers with token of the interfaces.
Bibliography
[Change TCP / IP configuration] (https: / / support.microsoft.com / es-en / windows / change-la-configuration% C3% B3n-de-tcp-ip-bd0a07af-15f5-cd6a-363f-ca2b6f391ace # WindowsVersion = Windows _ 10) [General information on commands] (https: / / openwebinars.net / blog / 20-mandios-de-red-mass-importantes-code%)
[PING Command] (https: / / apontesjulio.com / como-usar-el-comando-ping /)
[NSLOOKUP command] (https: / / axarnet.es / blog / que-es-nslookup)
[Description of command parameters] (http: / / trajano.us.es / ~ fornes / ARSSP / CommandosRedWindows.pdf) [Debian network configuration] (https: / / wiki.debian.org / es / NetworkConfiguration)
[ifconfig command] (http: / / somebooks.es / comando-ifconfig-ubuntu /)
[ip command] (https: / / www.redeszone.net / tutorials / servers / configure -linux-comand-ip-iproute2-suite /)